Archive
Chocolate Pecan Pie

Katie Bug – Our New Dog
Matt’s birthday was this past weekend. Since his birthday is around Thanksgiving, pumpkin often figures into his birthday dessert. I’ve made an effort to change it up over the years and have made him a mocha ice cream pie, panna cotta, pecan pie, and bread pudding. Matt is not a huge cake fan, except for carrot cake (maybe next year?!?). This year, we had a few friends over to celebrate Matt’s birthday and to meet our new dog – Katie. Yes, that’s also my name. When you adopt a senior, special needs Aussie you can’t just change her name, so we call her Katie Bug, Katie Jr., Katie Pup (I’m now known as Katie Human to our friends), etc. I hope she can one day join me on a rug in the kitchen while I cook. Right now, she is too scared to venture into the kitchen unless it is a quick visit for a green bean treat. She loves her green beans! I loved that Will kept me company in the kitchen. I didn’t mention it, but we lost him in July. He was almost 15½. He was a wonderful dog and is greatly missed. We are thankful to share our home with another dog. We adopted Katie on November 17th, she is a sweetie and a welcome addition to our family.
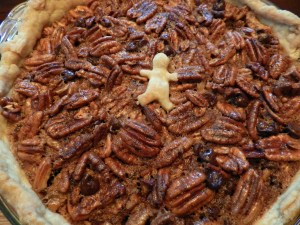
I baked Matt one of his favorite desserts for his birthday – a chocolate pecan pie. I made it completely from scratch. Haven’t done that in years. Yes, I cheat sometimes and use store-bought crust (Immaculate Baking Company’s refrigerated pie crust is good and easy). When I say “by scratch,” I mean it: gathered the pecans while walking through our neighborhood, shelled them on the front porch (yes, we live in Alabama!), and made the crust (thank you Ina Garten). Then topped the pie with a little “Matt Man” cutout :). Hope you like it. It’s great for a birthday (or any day!).
Chocolate Pecan Pie
Chocolate Pecan Pie (Print recipe)
Crust:
6 tablespoons cold salted butter
2½ tablespoons cold vegetable shortening
1½ cups flour
1½ teaspoon sugar
½ teaspoon salt
3 to 4 tablespoons ice water
Dice the butter. Put the butter and vegetable shortening in the refrigerator while you prepare the dry ingredients. Place the flour, sugar, and salt in the bowl of a food processor fitted with a steel blade. Pulse a few times to mix. Add the butter and shortening. Pulse 8 to 12 times, until the butter is about the size of peas. With the processor pulsing, gradually add the ice water. Pulse until the dough begins to form a ball. Pour dough onto a floured surface and form into a ball. Take care not to overwork it. Wrap in plastic wrap and refrigerate for 30 minutes. Roll into a circle on a floured surface, gently fold, place in a pie dish, and crimp the edges.
Filling:
3 eggs
1 cup white sugar
1 cup corn syrup or golden syrup
1 tablespoon melted butter
1 teaspoon vanilla
¼ salt
2 cups pecans
¼ to ½ cup chocolate chips (depends on how much you like chocolate)
Preheat oven to 350°F.
Lightly beat the eggs. Stir in the sugar, syrup, butter, vanilla, and salt. Mix well. Stir in pecans and chocolate chips. Pour pecan filling into pie crust.
To prevent over-browning, you can cover the crust edges with pie shields or pieces of aluminum foil. Bake on center rack of oven for 60 to 70 minutes (see tips for doneness, below). Remove crust shields after about 45 minutes. Cool for 2-4 hours on a wire rack before serving.
Doneness Hints from the Karo website:
Pie is done when center reaches 200°F. Tap center surface of pie lightly – it should spring back when done.
Variation:
For something different, add ¼ to ½ cup of shredded coconut.
Credits:
The crust is based on a crust recipe from Ina Garten and the pie filling is based on the Karo Syrup recipe.
Pumpkin Bread Pudding
Not sure I’ve posted a recipe without a photo. But I am tonight, because I don’t have time to make the dish and take a photo. Plus, I wanted to get it posted before Thanksgiving. Ok, so there isn’t a lot of time to make this in time for Thanksgiving, but it is quick. And you might be making a pumpkin pie anyway, you could have leftover bread, so you might have all the ingredients already. And maybe you feel like trying something new.
This Pumpkin Bread Pudding is a nice alternative to a traditional pumpkin pie. It combines the best of two worlds–pumpkin pie and bread pudding! It’s not just for Thanksgiving time; you can make it year round. I keep a bag of bread cubes in the freezer. If we have an extra chunk of bread, it goes in the bag. When I get enough, then I make it.
Hope you have a wonderful and safe Thanksgiving. Many thanks to all of you.
Bread Pudding
5 cups stale firm bread “cubes” (crusty French bread, cinnamon swirl bread, etc.)
3 tablespoons melted butter
1⅓ cups sugar
3 large eggs
2 cups half-and-half (or 1 cup milk and 1 cup cream
15 ounces pumpkin purée (canned pumpkin is fine)
¼ teaspoon salt
1 teaspoon cinnamon
¼ teaspoon cloves
¼ teaspoon ginger
¼ teaspoon nutmeg, freshly grated
½ teaspoon vanilla
½ cup golden raisins (or dried cranberries)
½ cup chopped pecans (or walnuts)
Optional toppings: whipped cream, warm dulce de leche or caramel sauce, whiskey sauce, and/or a sprinkle of pecans.
Preheat the oven to 350°. Melt the butter in an 11×17 baking dish. Swirl it around to coat the bottom and sides. This is a lot of butter, but you will later pour the excess into the pumpkin mixture. Tear or cut the bread into medium pieces and place in a large mixing bowl. Sprinkle the bread with ⅓ cup of sugar, toss it around, and let it sit while you prepare the pumpkin mixture.
In a separate bowl, lightly beat the eggs. Add 1 cup sugar, half-and-half, pumpkin, excess butter, salt, spices, and vanilla. Mix well. Pour the pumpkin mixture over the bread and stir. Place half in the baking dish, sprinkle with raisins and pecans. Top with remaining mixture. Top with the other half of the mixture. Bake for 25-35 minutes or until firm and lightly brown. Serve warm with one of the toppings or enjoy it plain!
Peach Cubes

Fresh AL Peaches!
Peaches are plentiful at farmers markets throughout North Alabama. We bought a small basket at the Greene Street Market last week. I enjoy eating them fresh, but there were a bunch in that little basket. So, I thought of ways to put them up and enjoy them this winter. Usually, I slice them and freeze them. Sometimes with a little lemon juice to keep them from browning. I might also add a bit of sugar. Frozen peaches are great for making cobblers, smoothies, peach pies, etc. However, depending on how you freeze them you can end up with a huge block of frozen peaches! Not the easiest to handle; unless you measure the quantity you need for a specific recipe and only freeze that amount in each container (I freeze 5 cups of peaches for cobbler).
I freeze pesto, tomato paste, yogurt, herbs, etc. in ice cube trays so why not pureed peaches!?! This weekend, I made pureed peach cubes! While making them, I vaguely recalled my mom doing this when I was a kid. The peach cubes are kinda boring looking, so I did not take a photo of them. A special thank you to Marilyn Evans for the beautiful photo of peaches available at the Greene Street Market at Nativity. I will take photos when the cubes are transformed in a recipe…maybe a smoothie, daiquiri, popsicle, fruit slush, something.
Peach Cubes
1 pound peaches, pitted and sliced (you can peel them if you want or just spot-peel as needed)
1 tablespoon lemon juice
Put the peaches and lemon juice into a blender container (or food processor container). Puree until smooth. If you want to leave a few large pieces, that is fine, whatever you prefer! Pour into ice cube trays. Freeze. Remove cubes and store in resealable plastic bags in the freezer.
Coming soon…what you can do with the peach cubes!
Butter Cookies

Butter Cookies
Not sure why my thoughts have turned to Christmas cookies, but they have. The temperature is in the 90s, the humidity is horrific, and it feels like we are in the 100s. Maybe that is why I am thinking about Christmas cookies at the end of July! Not to wish my life away, but I am longing for cooler days and nights.
Sorry for another post so soon after Friday’s post, but at least these cookies go well with the iced coffee! When I started this blog, I wanted to post 50 recipes a year, but I am shy of my goal. If I post three recipes before the end of Monday, I’ll meet it. I hope you will please bear with me :).
Doesn’t matter if you call them Russian Tea Cakes, Butter Cookies, Nut Balls, or Mexican Wedding Cookies, they are good! Hope these cookies put you in a cooler frame of mind.
Butter Cookies (Print recipe)
1 cup unsalted butter, softened
⅓ cup sugar
2 cups flour
½ cup chopped nuts (walnuts or pecans)
2 teaspoons half-and-half (or milk)
1½ teaspoons vanilla
½ teaspoon salt
Powdered sugar, for rolling
With an electric mixer, cream the butter and sugar until light and fluffy. Stir in the flour, nuts, half-and-half, vanilla, and salt. Mix well. Chill dough in the refrigerator. Roll dough into small, quarter-sized balls. Preheat oven to 375° F. Bake on an ungreased cookie sheet lined with parchment paper for 12 to 15 minutes, until golden. Place cookies on racks to cool for a few minutes. Roll in powdered sugar. Return to cooling racks and cool completely. Store in an airtight container. Makes: about 3 dozen cookies.
Shortcut Dobosh Torte
Today’s post is in honor of my dad, Grady. Today would have been his 78th birthday. My mom’s writing encouraged me to start this blog. But it was my dad’s love of food and cooking that inspired me to cook.
Dad (aka Poops) was not a fan of desserts but he loved this Shortcut Dobosh (Dobos?) Torte. Growing up, I made it for Father’s Day and his birthday almost every year. After reading the Wikipedia link for Dobos Torte, I am not convinced this is a true Dobosh Torte, but it certainly is a fast version. The secret to this quick torte/cake is pancake mix! I know it sounds odd, but it makes a nice torte. The cake layers are dense and spongy, yet light and airy at the same time. I have no idea where we acquired the recipe – it’s another faded clipping in my mom’s old photo album cookbook. It’s been a family favorite for as long as I can remember. I’ve made a few changes over the years, but it’s roughly the same recipe.
Back in 2006, Penzeys Spices, published a cooking magazine, Penzeys One. Each issue had a theme and they asked readers and catalogue subscribers to submit recipes matching the theme. For this particular issue (Volume 1, Issue 4), Penzeys issued a call for recipes from folks named Smith. Well, I’m a Smith so I submitted a few recipes. This torte recipe was selected (along with my Roasted Rosemary Walnuts recipe). They wrote a nice article and included a few photos. If you click on the photos, at the end of this post, you might be able to read the article if you are inclined. Or, if you want, you can even order back issues of the magazine. They are $6 plus $2 shipping. You can usually get back issues at Penzeys retail shops, too.
Hope you will give this recipe a try, even though it sounds odd since it’s made with pancake mix! Enjoy…
Shortcut Dobosh Torte (Print recipe)
Cake:
5 eggs
½ teaspoon salt
1 teaspoon vanilla (Penzeys of course!)
1 cup sugar
1½ cups pancake mix (We use Bisquick. I wonder if the gluten-free mix would work?!?)
Filling:
2 cups whipping cream
½ teaspoon vanilla
¼ cup sifted confectioners’ sugar
¼ cup cocoa powder (Penzeys :)
pinch of espresso powder (or instant coffee), optional
Garnish:
2 squares (2 ounces) semisweet chocolate, shaved or grated
¼ cup slivered almonds, toasted
Preheat oven to 350° F. In a large mixing bowl, combine eggs, salt, and vanilla. Beat until thick and lemon colored, about 5 minutes. Gradually beat in the granulated sugar. Fold in the pancake mix. Pour into two* greased and wax paper (or parchment) lined 9×1½ inch round cake pans.
Bake for 12 to 15 minutes. Cool slightly. Then, remove the cakes from the pans. Peel off the waxed paper or parchment paper. Let the layers cool completely on a cookie rack.
Now the tricky part…using wooden toothpicks as guides, split each cake into two layers (so you end up with four even layers). My layers were usually lopsided. So I came up with a different method…
*I pour the batter evenly into three round cake pans. So no slicing of the layers is needed. It doesn’t matter if the cake is three layers or four layers. You could even use two pans and keep them whole. You would have extra frosting that could be used to frost the sides. So it would be a 2-layered cake instead of torte. It would still taste good!
Please use the method you prefer (which might be limited by the number of round cake pans you have!).
Make filling by combining whipping cream, vanilla, confectioners’ sugar, cocoa powder, and espresso powder. Whip until creamy and thick.
To assemble torte, place cake layer on serving plate cut side down (if you sliced your layers). Spread with 1 cup of filling; sprinkle with about 1 tablespoon of the shaved chocolate. Repeat for the remaining layers.
Garnish: Sprinkle toasted almonds and grated chocolate on the top layer. Serves: 10-12.


Extra Sorbet
 Scenario: you make sorbet for dessert. However, you eat too much dinner. So, what do you do with the leftover sorbet? Well, we ran into this situation over the weekend with extra berry mojito sorbet. Can you say too much pizza?
Sorbet needs time to ripen (firm up) in the freezer. However, it can freeze really hard. So firm, that it is difficult to scoop out of the container. The good thing is, sorbet is very forgiving – you can soften it and refreeze it without altering the texture (unlike ice cream which makes weird crystals). I kinda thought there might be too much sorbet on Friday evening, so when I was serving dessert, I made a few extra scoops and re-froze them. That way, they were in convenient serving sizes for repurposing into tasty beverages. First, I made a sorbet spritzer on Saturday evening. Then, on Sunday morning, I made a sorbet kefir smoothie. I think they were both good ways to enjoy the deliciousness that was the extra berry mojito sorbet. Hope you also enjoy them
Print Recipe Feature
I also hope you like that I finally have a print button! I know lots of folks who use tablets, smartphones, and laptops in the kitchen and I do too on occasion. Though generally, I am a Luddite and I like an old-fashioned printed recipe (often I add handwritten notes in the margins). But I do not want to print an entire blog entry because I try to be mindful of printing too much. Now, with the handy-dandy Print recipe link, you can print a plain version of the recipe. Thanks to Anastasia at While Chasing Kids for the inspiration. Her blog is awesome and she has used this feature for some time. So I peeked at the code and we figured out how to do it on my posts. Eventually, I will go back and add it to some other posts (especially long recipes).
 Sorbet Spritzer
(Print recipe)
2 scoops sorbet
Sparkling water, chilled (Pellegrino, club soda, seltzer, etc.)
Garnish: few berries (or whatever fruit is in the sorbet), mint leaves, and/or lime wedges
Serves: 2
Put a scoop of sorbet in each glass. Top off the glass with sparkling water. Garnish and enjoy!
 Fruity Sorbet Kefir Smoothie
(Print recipe)
2 scoops sorbet
2 spears of fresh pineapple, sliced
2 fresh peaches, sliced (pits removed)
Splash of low fat plain kefir (or yogurt)
Serves: 2
Put all the ingredients in a blender. Cover. Process until smooth. Enjoy.
Other ideas for repurposing sorbet:
- Sorbet ice cubes: Just before you ripen the sorbet in the freezer, take some and freeze in ice cube trays. Then you can use the cubes for spritzers or smoothies. Probably easier than making scoops, freezing them, and then storing them. Just keep the cubes in a resealable plastic bag.
- Sorbet popsicles: You can make little square popsicles by placing a toothpick into each cube once it is semi-set. Then freeze until firm and enjoy. Or, if you have popsicle molds, even better! I guess little jars or cups with popsicle sticks would also work.
Berry Mojito Sorbet
 Here’s another recipe using the mint simple syrup recipe from a few weeks ago. Having simple syrup already in the refrigerator makes a quick sorbet since it saves a step. Also, there is no need for extra time to cool the hot syrup.
For this sorbet, I used a combo of frozen blackberries and blueberries because we had leftovers from last summer. Fresh berries would also be great in this recipe.
Berry variations: You could use all blueberries or all blackberries. Just adjust the quantities. If you use only blueberries, use 4 cups. If you use a mixture of berries, use 2 cups blackberries and 2⅔ cups blueberries. If you use all blackberries, which I’ve never tried, use about 6 cups. The reason is that when you strain the puréed mixture, you will lose some purée the seeds are removed. The blackberries I used were very “seedy” so I had to supplement with some extra blueberries. You want to end up with just under 4 cups of puréed fruit.
I decided to make this Berry Mint Mojito Sorbet to take to our friends’ house last night. I’ve only made it one other time. Nothing like cooking experiments among friends! Marshall and Melanie recently built a brick pizza oven in their backyard and they invited us over to celebrate our recent job news with a pizza dinner. Matt received a promotion at work and I love my new part-time editing job. Woo hoo, job-wise it was a good week at the Smith-Jordan house.
Back to the pizza and dessert…we all provided different toppings and made our own pizzas (most of the toppings came from our gardens!). I knew we would eat a lot, so I wanted to make a light dessert. However, I had no idea we’d eat that much. Oh my goodness, the pizzas were incredible! Aside from the pizza in Italy on our honeymoon, these were the best pizzas I have tasted. They were so worth the gluten splurge. By the end of the pizza fest (or pizza feast), I was glad we had a light and refreshing frozen dessert. Melanie had sliced fresh peaches with honey and citrus, a perfect accompaniment to the sorbet. Fresh berries and mint leaves are also nice additions. Hope you enjoy this refreshing summer dessert:
Berry Mojito Sorbet
2 cups blackberries
2⅔ cups blueberries
¾ cup mint simple syrup
2 tablespoons lime juice (I only had lemon juice, but it worked)
1-2 tablespoons rum (optional, but the alcohol helps the texture)
Pinch of salt
Optional garnish: berries, sliced peaches, and sprigs of mint.
Serves: 8-10
Heat half of the berries in a saucepan on medium heat for about 3-5 minutes. You want to heat them until some of the berries pop. Remove from heat and add the other berries. Purée them in a blender or in a food processor until almost smooth. Strain the berries using cheesecloth, a sieve, or a chinois conical strainer to remove excess seeds. I strain the mixture directly into my large quart Pyrex measuring cup because it has a spout and this makes it easy to pour the base into the ice cream freezer. [Plus, this container fits perfectly in an ice bath (to speed up the chilling time). You can skip the ice bath step, just make the base and let it chill for several hours or overnight. You want the base as cool as possible before you churn it.]
Add the simple syrup, lime juice, rum, and salt to the strained berry purée. Taste and adjust as needed. Depending on the sweetness of the berries, you might want to add more simple syrup or more lime juice if they are very sweet. Place the Pyrex container in an ice bath for a quick chill. Then chill the mixture in the refrigerator for a few hours. Freeze in an ice cream maker according to the manufacturer’s instructions. Let ripen (firm up) in the freezer before serving. Serve with berries, peaches, and sprigs of mint if you want.
Magic Triple Berry Cobbler
 This is a new and improved recipe for Magic Blueberry Cobbler from last August. We had fresh strawberries but not enough to make a strawberry-only cobbler. It takes a lot of strawberries for a strawberry cobbler (5-6 cups)! Probably why you don’t find it on the menu at many restaurants. Since we didn’t have enough strawberries, I added fresh blackberries and frozen blueberries (need to finish last year’s bounty before we pick more). When I re-read the original recipe, it was confusing. So I simplified it.
I’ve used this basic recipe with blueberries, strawberries, blackberries, and peaches (various combinations). Probably my favorite is the triple berry. Not sure if the recipe would work with apples. I don’t think there is enough moisture in the apples to make a filling. Maybe if I added some water or apple juice??? It might be worth trying one of these days (maybe I’ll make a half batch just in case it doesn’t work).
Magic Triple Berry Cobbler
Fruit Filling:
3½ cups fresh strawberries, hulled and sliced
1 cup fresh blueberries (frozen berries also work)
1 cup fresh blackberries
2 tablespoons fresh lemon juice
Preheat oven to 350°F. Mix and spread the berries in a 9×13” buttered baking dish. Drizzle the lemon juice over the berries and set aside.
Batter:
2 cups all-purpose flour
2 teaspoons baking powder
½ teaspoon salt
¼ teaspoon freshly grated nutmeg
¼ teaspoon ground cinnamon
1¼ cups sugar
1 cup milk (I use half-and-half with a little water or whole milk)
5 tablespoons butter, melted
1 teaspoon vanilla extract
In a medium bowl, combine the flour, baking powder, salt, nutmeg, cinnamon, and sugar. Mix well. Stir in the milk, butter, and vanilla. You will end up with a thick batter. Spoon the batter over the berries and spread in an even layer. Use a light touch; otherwise you might end up with berries in the batter (similar to a muffin).
Magic Topping:
1¼ cups sugar
½ teaspoon salt
2 tablespoons cornstarch
1½ cups boiling water
In a small bowl, combine the sugar, salt, and cornstarch. Use a whisk or fork to mix it thoroughly. Sprinkle this mixture evenly over the batter. Pour the boiling water over the top of the cobbler. Using the handle of a wooden spoon, poke about 6 to 8 holes in the batter so the water and magic topping can reach the berries. Bake for 1 hour or until bubbly and golden brown. Serve it warm, at room temperature, or even cold!
Banoffee Pie
 What does a born-and-raised Southern woman make for a going away dinner for a friend from the UK? A banoffee pie, of course! According to Wikipedia, a banoffee pie is “an English pastry-based dessert made from bananas, cream, toffee from boiled condensed milk (or dulce de leche), either on a pastry base or one made from crumbled biscuits and butter. Some versions of the recipe also include chocolate and/or coffee.” I had no idea what I was getting into. I’d never tried a banoffee pie; I just knew that Conor mentioned that he liked them. I liked the idea behind it – crust, layer of soft toffee (a.k.a. caramel), sliced bananas, whipped cream, and grated chocolate. What’s not to love?!? Also, it sounded like it might be fairly easy to make.
So I turned to Google and searched for a banoffee pie recipe. I found several versions. Some used pastry crusts, others used crumb crusts. Some had homemade toffee made from scratch; others used a toffee filling made from sweetened condensed milk. Some included chocolate; others did not. The common thread was sliced bananas and whipped cream. Next time, I will try flavoring the whipped cream with some espresso powder. I only used vanilla this first time, but I think coffee would give it a nice flavor boost.
Dinner was rather spur of the moment. We originally planned to meet at Sam and Greg’s, a local pizza and gelato shop. But that just didn’t seem right. A home cooked meal seemed like a better send off for Conor before he moved to Richmond, VA. Conor was our co-worker from our days in Building 17 at Intergraph. I was the Betty Crocker of the group and cooked for the folks in the bay. That’s actually kind of how Matt and I started dating. When I’m stressed, I bake. When I started the job at Intergraph, I was stressed a lot! So, there was lots of baking. I would bring in food and Matt would stop by my cubical and we started hanging out together.
Back to dinner and the banoffee pie. I had my food preservation class earlier that day at Harrison Brothers Hardware. I completely forgot it was the same day as the going away dinner. So, I decided on something easy to prepare – homemade chicken and dumpling stew, a fresh picked salad from our garden, and a quick version of the banoffee pie.
Figured there was not enough time to make homemade caramel or toffee, so I used a can of Nestle’s La Lechera (The Dairy) dulce de leche. This particular brand is made in Chile and it is awesome! You can find it at a Latin American market or in the international section of a large grocery store. Usually, Publix and Kroger carry it (in Huntsville and Madison). When I find it on sale, I buy a few cans and keep it on hand. It is almost as good as a homemade caramel and it is so much easier! It reminds me of the caramel we made as a kid by boiling unopened cans of sweetened condensed milk. This method produces great results but it can be dangerous. Cleaning caramel from the ceiling is not fun :(. I would not recommend this method! However, if you are inclined to make your own dulce de leche, I would recommend looking at Cooking for Engineers. A great website and they provide a safer method.
I liked the idea of a crumb crust since it is quicker to make than a pastry crust. I decided to go with the digestive biscuits recommended in a few recipes. This is my new go-to crumb crust; it isn’t as sweet as a graham cracker crumb crust. Digestive biscuits are easy to find in Huntsville. You can get them at Publix, Kroger, The Fresh Market, Earth Fare, and the European Market on the Parkway. TJ Maxx and Target also stock them on occasion. I like the McVitie’s brand. If you can’t find them, shortbread wafers or graham crackers would be fine. Or if you want to make a pastry crust, go for it!
 The finished pie in the photo is a little thin. I should have used a 9” or 11” springform or tart pan. However, I made three pies (9”, 4½”, and cupcake sized). The cupcake was for testing (you need a sample when experimenting!), the small pie was for Conor to take home. That left me with either a 9” or 11” pan. I went with the 9” and the caramel layer was a little thin.
Bottom line, this is an easy recipe, though I’m not sure it is a true banoffee pie. But it was tasty and Conor liked it (high praise!). So here is my version of a quick banoffee-like pie…
Crumb Crust:
2 cups cracker or cookie crumbs* (I used 16 McVitie’s Original Digestive Biscuits)
½ cup unsalted butter, melted
1 teaspoon sugar
Pinch of salt
Preheat oven to 350º F. In a medium bowl, combine the crumbs with the sugar and salt. Stir in the melted butter. Press the mixture into a 9” or an 11” spring form or tart pan lined with parchment paper (just to make slicing and removing the pie easier). Use the back of a spoon or a measuring cup to press the mixture up the sides of the pan. Bake for 10 minutes. Cool on a rack. Then refrigerate until firm.
Filling:
13.4 ounce can La Lechera dulce de leche
3-4 bananas (firm, not too ripe)
½ pint heavy whipping cream
1 teaspoon vanilla
1 teaspoon powdered sugar
pinch of espresso powder or instant coffee, optional
1 ounce chocolate, grated
Heat the caramel. You can heat it on the stove or in the microwave. Heat just until it is warm and soft. It can burn, so don’t overheat it. Actually, I just placed the entire can in the warm oven after the crust baked. Pour the warm caramel into the cooled crust. Spread it with a spoon. Try not to dig into the crust or you might get crumbs in the caramel. It tastes fine, but the texture gets a little funny. Chill for an hour or until the caramel is firm.
Slice the bananas into ¼-½” uniform slices (just depends on how much banana you want). Arrange in a single layer on the caramel. Whip the cream and add the sugar and the vanilla (and coffee if you want). Top the bananas with the whipped cream. Sprinkle with grated chocolate. Chill until you are ready to serve.
This pie is better served fresh. Even covered in whipped cream, the bananas can get a little mushy for my taste once refrigerated. I made it and served it on Thursday, it was great on Friday. The last slice on Saturday was not as good as the one on Thursday. Serves 8.
Strawberry Shortcake Pie

Earlier this week I went with a friend to pick fresh strawberries at a local farm. We each picked two gallons of berries! Putt planned to dry most of her strawberries (yum). I had other plans for mine: I removed the hulls and froze a large bag of whole berries for future smoothies, margaritas, and mojitos; baked a pie; and ate plenty of them plain, only washed. They were all delicious!
Today, I made my first batch of homemade strawberry jam. Or is it preserves? What is the difference between preserves and jam? That might be a future blog post. I originally planned to make a quick and easy freezer jam, because I’m a little intimidated by canning. But then I realized I’ve canned pepper jelly, so this is probably about the same.
I made eleven jars of jam: eight regular, one jar of jelly (the last jar had no pieces of fruit, so I think that is jelly), and two strawberry habanero. It sounds like a strange combination but I think it will be good on cream cheese and served with crackers. I love hearing the sounds of the lids popping. I can hear them as I type. I would include the recipe in today’s blog, but I just followed the directions inside the box of Sure-Jell fruit pectin (http://www.kraftbrands.com/surejell/howto_cookedjam.aspx). Everything worked out fine until I was cleaning up the kitchen: somehow, a tiny Mason jar fell down into the garbage disposal. I didn’t realize this until it was too late. Yep, little bits of glass all in the disposal. I think Matt and I will try to fix it this weekend. This will be the second one we have repaired (never stick flower stems down a disposal, it will likely clog it!). We never had a garbage disposal growing up, so that’s my excuse for my disposal accidents.
We support local farms when we can. We are fortunate to have several wonderful farms in North Alabama and Southern Tennessee. If you live outside the area, I hope you will support your local farms and farmers markets. Here’s some information about three of our favorite farms that provide local, fresh, and delicious strawberries (among other things)!
Brown Farms: Their farm is in New Market. Directions from Huntsville: take North Parkway/231 North, turn right on Joe Quick Road, turn left on Walnut Grove Road and follow the signs to the farm (it will be on your left). If you can’t make it to the farm to pick your own or buy fresh berries, you can buy their strawberries at local Star Market Supermarkets (the one in 5 Points usually carries them this time of year). Address & Phone: 384 Walnut Grove Rd New Market, AL 35761, 256-828-0710
For more information about Brown Farms: http://www.pickyourown.org/ALhuntsv.htm
Dennison’s Family Farm: This farm is a little further away in Elora, TN. They sell already picked strawberries at the farm or you can visit one of their cute little strawberry “houses” in Madison (across from City Hall in front of Hartlex Antiques on Hughes Road), Fayetteville, and Winchester (please call for exact locations). They also have a community supported agriculture (CSA) program if you are interested in trying one. Address & Phone: 98 Milner Switch Road, Elora, TN 37328, 931-937-8162
For more information about Dennison’s Family Farm: http://dennisonsfarm.com/ or info@dennisonsfarm.com
J. Sparks Farm: I’ve only visited this farm once, but I got a behind-the-scenes tour with the owner’s sister. It is a nice farm, and it is a little easier on the knees picking the strawberries standing up since it’s a vertical hydroponic farm. The strawberries (and lettuce) were wonderful. I’m not sure if they are growing strawberries this year, but I hope to see them back at the Greene Street Market at Nativity when they open for the season next week, on May 3rd! Address & Phone: 312 Esslinger Drive, Gurley, AL, 256-776-9881
For more information about J. Sparks Farm: http://www.jsparksfarms.com/
My public service announcement for local farms is over. And now back to the blog…

Today’s recipe is not healthy, vegan, nor is it gluten-free*. It is a once in a while splurge-worthy dessert – Strawberry Shortcake Pie. Actually, for us, it is a once every 5 year splurge. It’s a fairly simple recipe and it’s not the most outrageous dessert I make, but for some reason, we just don’t have it very often. I’ve known my husband, Matt, since 2007. I baked this pie for him the first time in May 2007 and haven’t made one since. I figure we are good until April or May of 2017! Wow, that sounds like a long way away!
I guess this recipe originally came from a magazine because my mom pasted an old clipping into her photo album cookbook. At the bottom of the recipe, it says, “continued on page 120.” Page 120 is not included in her cookbook. I’ve always wondered what was on that page! I’ve stayed fairly true to the original recipe, only made a few changes: 1) My pie plate is 9.5” instead of 9” so I increased the crust ingredients just a bit; 2) I omitted the red food coloring, I think the glaze is perfectly lovely without the added coloring; 3) Changed the name, instead of Strawberry Glazed Whipped Cream Pie it is now the Strawberry Shortcake Pie (it reminds me of the homemade shortcakes I made as a child); and 4) I sliced some of the larger strawberries, whole berries make slicing the pie challenging.
Strawberry Shortcake Pie
Shortcake Crust:
1½ cups biscuit mix (I use Bisquick)
6 tablespoons butter, softened
scant ⅓ cup boiling water
Preheat oven to 450º F. Place biscuit mix and softened butter in the bottom of a 9.5” or 10” pie pan. Pour in the boiling water. Stir mixture with a fork until it forms a soft ball and leaves the side of the pan. Don’t overwork the dough or you will end up with a tough crust. Use your fingers to pat the dough evenly over the bottom and sides of the pan. If you are good at such things, you can press the dough over the rim of the pie plate and then form the dough into a neat, decorative design on the edge. I’m not so good at that, so I just use my finger (or a fork) to make an indentation on the top edge of the crust. Use a fork to dock the crust – poke holes along the sides and bottom of the crust to allow steam to escape and keep it from puffing up. Bake 10-12 minutes until it is golden brown. If you have pie crust shields, you might want to use them to keep the edges from over-browning, but it’s not necessary. Just check the crust after baking about 9 minutes to make sure it turns golden and does not burn. Remove crust from the oven and let it cool.
Strawberry Filling:
6 cups fresh strawberries
½ cup water
2½ tablespoons cornstarch
1 cup sugar
1 tablespoon butter
Fresh whipped cream, optional garnish
Wash and drain the strawberries. Save a few pretty ones for a garnish. Remove the hulls from the rest. Crush 2 cups of the strawberries and set aside. Cut the remaining 4 cups of strawberries into halves, quarters, or slices (whatever you prefer; I just don’t like slicing into a pie with large, whole berries). In a medium saucepan, stir together the water and cornstarch. Mix well. Add the sugar and stir in the 2 cups of crushed strawberries. Bring mixture to a boil and cook until clear, about 3-5 minutes. Remove from heat. Stir in the butter. Strain the mixture using a strainer, chinois, or a clean piece of cheesecloth. Arrange the 4 cups of strawberries in the cooled pie shell. Pour the warm glaze over the strawberries. Make sure all the strawberries are covered with the glaze. Refrigerate several hours until set. Garnish with whole strawberries and fresh whipped cream. Serve. This is not a pie that ages well. It is best to make it the day you plan to eat it. It gets a little soggy and isn’t as pretty the following day. It still tastes delicious. Yes, I’ve had leftover strawberry shortcake pie for breakfast the next day! Makes 8 servings.
*Healthier Version: I think this could easily be made gluten-free by using the gluten-free baking mix from King Arthur Flour of Pamela’s Products. I just haven’t tried it yet. Also, I noticed at Publix there is a “new” Gluten-Free Bisquick. I have not tried it either. I stuck to the original Bisquick because I wanted the taste from the childhood. You could also make your own crust; a crumb or nut crust would be delicious. Or even use a spelt crust (I saw them recently at Garden Cove and Earth Fare). To make it vegan, I think margarine or coconut oil could be used to make the crust (just gotta check the biscuit mix to make sure it is vegan). The rest of the recipe only has 1 tablespoon of butter to make the glaze “glossy!” I think coconut oil or margarine would make it plenty glossy.

