Archive
Chocolate Pecan Pie

Katie Bug – Our New Dog
Matt’s birthday was this past weekend. Since his birthday is around Thanksgiving, pumpkin often figures into his birthday dessert. I’ve made an effort to change it up over the years and have made him a mocha ice cream pie, panna cotta, pecan pie, and bread pudding. Matt is not a huge cake fan, except for carrot cake (maybe next year?!?). This year, we had a few friends over to celebrate Matt’s birthday and to meet our new dog – Katie. Yes, that’s also my name. When you adopt a senior, special needs Aussie you can’t just change her name, so we call her Katie Bug, Katie Jr., Katie Pup (I’m now known as Katie Human to our friends), etc. I hope she can one day join me on a rug in the kitchen while I cook. Right now, she is too scared to venture into the kitchen unless it is a quick visit for a green bean treat. She loves her green beans! I loved that Will kept me company in the kitchen. I didn’t mention it, but we lost him in July. He was almost 15½. He was a wonderful dog and is greatly missed. We are thankful to share our home with another dog. We adopted Katie on November 17th, she is a sweetie and a welcome addition to our family.
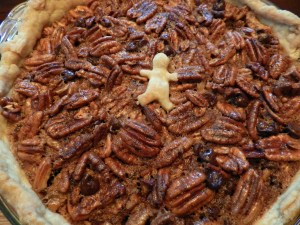
I baked Matt one of his favorite desserts for his birthday – a chocolate pecan pie. I made it completely from scratch. Haven’t done that in years. Yes, I cheat sometimes and use store-bought crust (Immaculate Baking Company’s refrigerated pie crust is good and easy). When I say “by scratch,” I mean it: gathered the pecans while walking through our neighborhood, shelled them on the front porch (yes, we live in Alabama!), and made the crust (thank you Ina Garten). Then topped the pie with a little “Matt Man” cutout :). Hope you like it. It’s great for a birthday (or any day!).
Chocolate Pecan Pie
Chocolate Pecan Pie (Print recipe)
Crust:
6 tablespoons cold salted butter
2½ tablespoons cold vegetable shortening
1½ cups flour
1½ teaspoon sugar
½ teaspoon salt
3 to 4 tablespoons ice water
Dice the butter. Put the butter and vegetable shortening in the refrigerator while you prepare the dry ingredients. Place the flour, sugar, and salt in the bowl of a food processor fitted with a steel blade. Pulse a few times to mix. Add the butter and shortening. Pulse 8 to 12 times, until the butter is about the size of peas. With the processor pulsing, gradually add the ice water. Pulse until the dough begins to form a ball. Pour dough onto a floured surface and form into a ball. Take care not to overwork it. Wrap in plastic wrap and refrigerate for 30 minutes. Roll into a circle on a floured surface, gently fold, place in a pie dish, and crimp the edges.
Filling:
3 eggs
1 cup white sugar
1 cup corn syrup or golden syrup
1 tablespoon melted butter
1 teaspoon vanilla
¼ salt
2 cups pecans
¼ to ½ cup chocolate chips (depends on how much you like chocolate)
Preheat oven to 350°F.
Lightly beat the eggs. Stir in the sugar, syrup, butter, vanilla, and salt. Mix well. Stir in pecans and chocolate chips. Pour pecan filling into pie crust.
To prevent over-browning, you can cover the crust edges with pie shields or pieces of aluminum foil. Bake on center rack of oven for 60 to 70 minutes (see tips for doneness, below). Remove crust shields after about 45 minutes. Cool for 2-4 hours on a wire rack before serving.
Doneness Hints from the Karo website:
Pie is done when center reaches 200°F. Tap center surface of pie lightly – it should spring back when done.
Variation:
For something different, add ¼ to ½ cup of shredded coconut.
Credits:
The crust is based on a crust recipe from Ina Garten and the pie filling is based on the Karo Syrup recipe.
Blogiversary!

Bread and Butter Pickles
Today marks the 1 year anniversary of The Flaming Pot Holder (and it is my 46th birthday)! Thank you all for reading my posts, trying the recipes, commenting on the recipes, sampling my food/drinks, offering excellent feedback, sharing my blog with friends, etc. I truly appreciate it! I have thoroughly enjoyed the past year. I am looking forward to the upcoming year and some changes to the blog – weekly postings, categorizing the recipes, revamping the look of the blog, improving my photographs, and creating a Facebook page for the blog. All in due time :)
This blog started with a tribute to my mom – recreating her cornbread recipe. Today’s post is also about my mom, this time her incredible Bread and Butter Pickles. The pickles in the photo were actually made by my mom. Mom made me a batch for my birthday in 2009. She shared a few jars with friends, but the rest of the batch was mine. Best. Gift. Ever! Mom’s friend Ursula had an extra jar from my mom and she gave it to me. We are down to the last jar and a half and we are savoring every bite.
I have never made these pickles by myself. Over the years, I helped my mom countless times. When our second set of cucumber plants start producing, I’ll make my very own batch. Hope you enjoy mom’s recipe for bread and butter pickles. They are a wonderful accompaniment to a garden-fresh veggie dinner with cornbread!

Bread and Butter Pickles (Print recipe)
Vegetables:
9 cucumbers, washed, NOT peeled
6 medium white onions
1 green bell pepper
1 red bell pepper
6 garlic cloves
⅓ cup salt
Ice
Wash the cucumbers, do not peel them. Peel the onions. Wash and core the bell peppers. Peel the garlic. Slice the vegetables thin (either a mandolin or a food processor would work well and save some time). Layer the vegetables with ice and salt. End with a layer of salt on top. Cover with a lid or a clean towel. Let everything sit for at least 3 hours (or overnight). Drain thoroughly. Make the pickling mixture:
Pickling Mixture:
3 cups distilled white vinegar
5 cups sugar
1½ teaspoons turmeric
1½ teaspoons celery seed
2 tablespoons mustard seeds
Combine the ingredients and pour the mixture over the drained vegetables. Heat to boiling only (stirring every now and then). Ladle into 8 sterile pint jars. Process according to your canner’s instructions. Wait one month after canning before serving. Makes: 8 pints.

Three Handwritings – Grandmom, Dad, and Mom?
Tomatoes

Tomatoes from Our Garden
One of my favorite things about summer is fresh tomatoes! I’m not a fan of the heat and humidity in Alabama, but they certainly make wonderful growing conditions for tomatoes. In our second year of gardening, we are growing several varieties of tomatoes – Cherokee Purple, Chello (yellow/orange cherry), Mr. Stripey (orange and yellow), Arkansas Traveler (pink), Green Grape, Black Cherry Tomato, and Jubilee (yellow and orange). Quite the colorful harvest!
My favorite ways to eat fresh tomatoes – salsa, pasta sauce, soup, salad, and sandwiches! Or, just eat them plain! Growing up, tomato sandwiches were an almost daily fixture in the summer. I like traditional tomato sandwiches, but my favorite is a toasted, open-faced sandwich. Growing up, we called it a Summer Sandwich. Matt and I enjoyed our first sandwich a few weeks ago. Tastes even better when you grown the tomatoes in your garden! The sandwiches are especially good if you are local and can purchase FredBread. Great bread baked in downtown Huntsville, by a guy named Jeff!
I haven’t included any measurements in the “recipe.” This is just a general guideline. Feel free to customize it to your tastes. Hope you like it!
 Summer Sandwich
(a.k.a. Toasted Open-Faced Tomato Sandwich)
Bread
Mayo
Mustard
Tomatoes, sliced
Salt and Pepper
Onions, sliced
Herbs, fresh or dried, basil, parsley, etc.
Cheese

Slice bread. Spread with mayo and mustard. Top with sliced tomatoes. Sprinkle with salt and pepper. Add onion slices. Top with herbs. Cover with cheese. Toast in a preheated 350º F toaster oven (or regular oven) until the cheese melts. Sprinkle with a few extra fresh herbs if you want. Serve and enjoy the taste of summer!
Cheese Straws

Cheese Straws
Today would have been my mom’s 76th birthday. Hard to believe it’s been almost three years since she died. Mom was my inspiration for starting this blog. She was a wonderful writer and gifted storyteller, though not the best cook. Mom was the first to admit it! She always said Dad was the better cook and she marveled at how Dad and I would cook without recipes. She urged me to write my recipes and share them with others. Hence this blog.
Mom had three favorite food groups – butter, salt, and mayo (it’s amazing she was as skinny as she was). Probably her favorite snack was cheese straws. Cheese straws have two of her basic food groups covered! It’s only fitting that I share the recipe today.
Cheese straws are a Southern party staple. We serve them at teas, birthdays, weddings, baby showers, open houses, gallery openings, and even at funerals. We give them as gifts and they are well-received. I always look forward to a package from our friend Ursula during the holidays. I know it will include her delicious cheese straws.
There are many different types of cheese straws. The traditional kind that I grew up with is made with flour, butter, cheddar cheese, cayenne pepper, and salt. The dough is typically pushed through a cookie press into long thin crispy straws. However, there are many other varieties: cheese straw wafers, cheese straw “biscuits” with Rice Krispies, sausage (or soy) cheese balls, and even cheese straw dough wrapped olive puffs (the star of many 1970’s cocktail parties at our house!). The South loves cheese straws so much that there are bakeries that specialize in them and there are cooks who have a cherished cheese straw recipe handed down between generations.
I have experimented with some healthier substitutes. Gluten-free flour blends are better now and can be used in the recipe. Spelt flour also works. Personally, I have not experimented with a vegan version, but I have heard it is possible to use almond or soy cheese and margarine (or a coconut oil blend).
This particular recipe is a tweaked version of several friends’ recipes with a few of my own twists. Special thanks to Dan Tatum, Ursula Vann, and Connie Ulrich for sharing their recipes over the years. I must give full credit to Dan for the technique. I have always used a cookie press but then I tried Dan’s cheese straws over the holidays. He rolled them out with a rolling-pin and then cut them with a pizza cutter. They were awesome! Like little crispy, French fry-shaped cheese biscuits of goodness. The cheese straws in the photos are a little short. We ate the long, pretty ones and then I decided to take photos for the blog. Oops, I’m still learning! Hope you enjoy one of my ma’s favorite snacks…
Cheese Straws (Print recipe)
2 cups grated extra sharp Cheddar cheese, softened at room temperature*
1 stick unsalted butter, softened at room temperature
1½ cups all-purpose flour
1 teaspoon salt
½ teaspoon cayenne pepper (or to taste)
Paprika
Preheat oven to 375º F. Mix all the ingredients – you can use a food processor, a mixer with a dough hook, or mix it by hand, the old-fashioned way (my preferred method!). You will end up with a thick dough. You can use either method to form your straws:
Traditional method: Use a cookie press with a star attachment to form the straws directly on a parchment lined cookie sheet.
-OR-
Dan’s method: Use a rolling-pin to roll out the dough on a floured surface. You want the dough about 3/16”. You can use chopsticks on either side as guides. Then, use a pizza cutter to cut long, thin strips. Transfer them carefully to a parchment lined cookie sheet.
Sprinkle with paprika. Bake for about 12 to 15 minutes, until golden brown. Cool on a rack. Store in an air tight container.
*Notes about the cheese: After grating the cheese, leave it out until it comes to room temperature. Whatever cheese you use, you want to grate it yourself! Store bought pre-grated cheese just isn’t the same in this recipe. Something must be added to keep it from clumping and it interferes with the texture of the cheese straws. Cheddar varieties: for the cheese straws in the photo, I used an extra-sharp aged white Cheddar cheese. They were delicious but not the same as when I use sharp or extra-sharp yellow Cheddar cheese. They just didn’t look the same. Cheese Straw Purists probably won’t like my white Cheddar substitution, but it’s what I had. I thought they were good, even if they weren’t traditional looking! And finally don’t skimp on the cheese, you want 2 full cups.
Magic Triple Berry Cobbler
 This is a new and improved recipe for Magic Blueberry Cobbler from last August. We had fresh strawberries but not enough to make a strawberry-only cobbler. It takes a lot of strawberries for a strawberry cobbler (5-6 cups)! Probably why you don’t find it on the menu at many restaurants. Since we didn’t have enough strawberries, I added fresh blackberries and frozen blueberries (need to finish last year’s bounty before we pick more). When I re-read the original recipe, it was confusing. So I simplified it.
I’ve used this basic recipe with blueberries, strawberries, blackberries, and peaches (various combinations). Probably my favorite is the triple berry. Not sure if the recipe would work with apples. I don’t think there is enough moisture in the apples to make a filling. Maybe if I added some water or apple juice??? It might be worth trying one of these days (maybe I’ll make a half batch just in case it doesn’t work).
Magic Triple Berry Cobbler
Fruit Filling:
3½ cups fresh strawberries, hulled and sliced
1 cup fresh blueberries (frozen berries also work)
1 cup fresh blackberries
2 tablespoons fresh lemon juice
Preheat oven to 350°F. Mix and spread the berries in a 9×13” buttered baking dish. Drizzle the lemon juice over the berries and set aside.
Batter:
2 cups all-purpose flour
2 teaspoons baking powder
½ teaspoon salt
¼ teaspoon freshly grated nutmeg
¼ teaspoon ground cinnamon
1¼ cups sugar
1 cup milk (I use half-and-half with a little water or whole milk)
5 tablespoons butter, melted
1 teaspoon vanilla extract
In a medium bowl, combine the flour, baking powder, salt, nutmeg, cinnamon, and sugar. Mix well. Stir in the milk, butter, and vanilla. You will end up with a thick batter. Spoon the batter over the berries and spread in an even layer. Use a light touch; otherwise you might end up with berries in the batter (similar to a muffin).
Magic Topping:
1¼ cups sugar
½ teaspoon salt
2 tablespoons cornstarch
1½ cups boiling water
In a small bowl, combine the sugar, salt, and cornstarch. Use a whisk or fork to mix it thoroughly. Sprinkle this mixture evenly over the batter. Pour the boiling water over the top of the cobbler. Using the handle of a wooden spoon, poke about 6 to 8 holes in the batter so the water and magic topping can reach the berries. Bake for 1 hour or until bubbly and golden brown. Serve it warm, at room temperature, or even cold!
Veggie Medley
 I am not a fan of the summer heat in Alabama; however, I LOVE the food that such a climate makes possible! This week, we still have salad fixings in our garden. We also have the first of our hot peppers and we have lots of green tomatoes! I’ve never seen so many tomatoes so early in the growing season.
The farmers markets are packed with people buying fresh produce. We went to the Madison City Farmer’s Market on Saturday and bought rainbow Swiss chard, new red potatoes, purple onions, green beans, peaches, and golden zucchini. We had fresh vegetables for dinner last night – sautéed chard with purple onions, a vegetable medley, and roasted asparagus (we bought that at Publix). And for dessert, we had sliced peaches and strawberries with a bit of whipped cream, sprinkled with gluten-free gingersnap cookie crumbs.
This vegetable medley recipe is my take on a classic Southern dish – green beans and potatoes. Typically, when you order green beans and potatoes at a Meat and Three (that’s what you call a restaurant that serves plate lunches), they are cooked with bacon and they can be a little mushy because they are cooked a long time.
More about Meat and Three restaurants…
At these restaurants, you often get a choice of a meat entrée and three side dishes (the choices can vary daily). Or, you can just get a veggie plate (my meal of choice). I thought these restaurants were all over the U.S., but then my husband Matt (“The Yankee”) told me it was regional. Who knew?!? Guess it is closest to a cafeteria, diner, or a dive in other parts of the country. Some of my favorite veggie sides include turnip greens, collards, black eyed peas, crowder peas, purple hull peas, squash casserole, green beans and potatoes, boiled okra, candied yams (a.k.a. glazed sweet potatoes), mashed potatoes, creamed corn, boiled cabbage, tomatoes and okra, fried okra, fried green tomatoes, and macaroni and cheese. I also love that at many Meat & Three restaurants, fruit cobbler (or banana pudding, a.k.a. nanner puddin’) counts as a vegetable. Also, congealed salad (a.k.a. Jell-O), tomato aspic (essentially, tomato Jell-O), and deviled eggs are also considered “sides.” Only in the South! Meals are served with an obligatory sweet tea. In this regard I am a Yankee and prefer unsweetened iced tea. There goes my southern cred (if there is such a thing!).
Unfortunately the food choices at many Meat and Three restaurants are not very healthy. Often, the dishes are cooked with lard or bacon, and lots of salt. In moderation and on rare occasions, these restaurants are fine. However, many people eat at these places every day. I think the sugar, salt, fat, and large portions are contributing factors to the obesity epidemic in the South. But you don’t need all the sugar, salt, and fat to have delicious Southern food. I am thankful there are nationally acclaimed chefs that are changing the perception of Southern cuisine. I am a big fan of two Southern chefs in the Birmingham area: Frank Stitt and Chris Hastings. Both are James Beard award winners and their restaurants prove that Southern food can be delicious and not over-the-top unhealthy.
Don’t get me wrong, I can cook unhealthy Southern fare; Paula Deen has nothing on me. However, I am making an effort to prepare healthier versions of the dishes I loved as a child. So, I decided to make a lighter version of the green beans and potatoes side, using fresh produce from the farmer’s market. It’s not the same as the side you might get at Mama Annie’s, G’s Country Kitchen, or Blue Plate Cafe, but it is good. I hope you will agree.
 Farmer’s Market Veggie Medley:
¼ to ½ cup chopped onion or shallot (I used 1 small purple onion)
1 tablespoon butter (or olive oil)
6 cups water
1 teaspoon salt (feel free to use less or omit if you are watching your sodium intake)
3 cups green beans, in 1-inch pieces (I think it was a pint container)
1½ cups chopped new potatoes (I used red and left most of the skin)
1½ cups chopped golden zucchini (or green zucchini, patty pan, or summer squash)
Salt and pepper (black or red), to taste
Chopped parsley or dill, optional garnish
In a frying pan, sauté the chopped onion in butter or oil. In a large pot, bring 6 cups of water to a boil. Add the salt. Stir in the green beans. Cover and simmer for 5 minutes. Add the potatoes and stir. Cover and simmer 5 minutes. Add the zucchini and stir. Cover and simmer for 5 minutes. Use a slotted spoon to strain out the veggies and add to the onions in the frying pan. Stir. Add a little of the cooking water (a.k.a pot likker or pot liquor) if you prefer more “sauce.” Add some more salt and pepper to taste (if you want). Serves: 4-6.
Strawberry Habanero Jam
 My mom was a canning fiend when we were growing up on Monte Sano Mountain. She canned jelly, bread & butter pickles (I have her recipe and when our cucumbers come in this summer, I’ll post it), spaghetti sauce, preserves, pickled okra, jam, tomatoes, dill pickles, green beans, apple sauce, pickled peaches, etc. You name it, she probably canned it. Almost everything she canned was from produce grown in our garden.
We moved up on the Mountain on June 29, 1972 (yes, I have a weird gift for remembering obscure dates!), so it was too late to have a garden our first summer. But the next summer, we had a nice little garden. My poor brothers moved tons of rocks (not literally tons, but it probably felt like it to them!) to get that first garden space prepped. They did the bulk of the wheelbarrow hauling, while my sisters and I helped pick the rocks out of the dirt. After a few years and countless hours of work, the garden blossomed (pun intended :-).
My parents were all about edible landscaping. Mom had a beautiful herb/wildflower rock garden with some azaleas and other flowering plants from my mimi’s house. However, the bulk of the landscaping was edible. I think my dad probably got this practical approach to “landscaping” from his father. My grandfather had a huge garden! Big gardens are especially helpful when you have five kids to feed. We grew lettuce, squash, cucumbers, spinach, peppers, horseradish, corn, okra, peanuts, cabbage, potatoes, and prize-winning tomatoes. Yep, Dad won an award one year at the Madison County Fair! He was so proud; we even had the ribbon framed. What I wouldn’t give for one of his tomatoes! They were so good, we’d go out to the garden with a salt and pepper shaker, pick a tomato, and eat it like an apple. Sometimes we sprinkled it with salt and pepper; other times we ate it plain. I can remember how it was still hot from the sun and how the juice would run down my arm. Oops, I got lost in a happy memory, time to get back to today’s topic: jam.
We also grew our own fruit – apples, pears, plums, apricots, peaches, and even grapes. Mom used the fruit to make jams, jellies, preserves, and fruit butters. In the blog last week, I posed a question – What is the difference between jam, jelly, and preserves? Well, it made think back to jelly and jam making with my mom and grandmother. I tried to recall what they said about the different types. If memory serves me correctly, these are the six different fruit concoctions we made:
1. Jam: Bits of mashed fruit, pectin, and sugar. I loved my Mom’s plum jam, with fresh plums picked from our trees.
2. Jelly: Fruit juice, pectin, and sugar. It was clear, no pieces of fruit. Mom’s famous jelly was her spiced grape jelly. In the summer, she made it with fresh juice from our grapes. In the winter, she made it with Welch’s grape juice. Wish I could find her recipe.
3. Preserves: Whole fruit, with pectin, gelatin, or something to make it set, and sugar. My grandmother made strawberry fig preserves with whole figs and strawberry Jell-O. It sounds weird, but it was delicious! I’ll post the recipe when our neighbors have figs to share.
4. Marmalade: Citrus peels, sugar, and pectin. Mom and I made orange marmalade once, but I don’t remember much about it…might be time to make some more.
5. Butter: Puréed fruit cooked down with sugar and spices. No pectin needed. Apple butter is my favorite, but I also like pear, sweet potato, and pumpkin butters.
6. Spread: Made without sugar and low-sugar Sure-Jell or some other type of pectin. We didn’t make this very often.
My latest culinary experiment was strawberry habanero jam. I made traditional strawberry jam last week, but added some chopped habanero peppers to one jar. I wanted to try it, but didn’t want to commit to an entire batch. I make pepper jelly, but I typically use a variety of peppers. For this strawberry pepper jam, I chose just habanero peppers because I wanted a pepper that had enough heat to stand up to the sweetness of the strawberries. It was really good and the heat was perfect for us. However, feel free to use red jalapeño peppers if you want a little less heat. We bought more Camarosa strawberries from Dennison’s over the weekend and decided to make another batch. This time, I made one jar of traditional strawberry jam and then added peppers and apple cider vinegar to the rest of the batch. It’s pretty tasty with a nice burst of sweet strawberries and then a spicy after-bite that lingers. I think it will be good poured over cream cheese and served with crackers. I could also see it as an excellent ice cream topping. I would probably enjoy the combination of sweet, spicy, and cold!
The recipe and instructions were tweaked from the Sure-Jell package insert (http://www.kraftbrands.com/surejell/howto_cookedjam.aspx). Canning is new to me so I don’t feel totally comfortable advising people on how to can and process jam. I’ve included some basic instructions in the recipe, but please follow the instructions that came with your canner. I’m hoping to improve my self-taught canning skills by taking a two-part canning seminar at Harrison Brothers Hardware. Yay, I’m excited to learn more and gain some confidence in my canning ability. If you are not local and want more canning knowledge, you might want to check with your local County Cooperative Extension Office or Botanical Garden to see if they offer canning classes. Here is the recipe for my latest experiment with an important note at the beginning…
*Note: Usually I put ingredient notes at the end of a recipe, but this one is important to me. Please use caution when handling hot peppers. I have asthma and the capsaicin from peppers can trigger an asthma attack. So, I use a mask when prepping the peppers – washing, seeding, deveining, and chopping them. I also wear my trusty non-latex gloves. Luckily, I have glasses that usually protect my eyes, but I also have a pair of back-up kitchen goggles if they are extremely hot peppers. I might look like a dork, but I’m a safe dork :-).
Strawberry Habanero Jam
4 pints strawberries (5 cups crushed)
1 box fruit pectin (I use Sure-Jell)
7 cups sugar
¼ cup habanero peppers, finely chopped (seeded and deveined if you want less heat)*
1 tablespoon apple cider vinegar
½ teaspoon butter or margarine, optional (to prevent foaming)
Prepare you jars: Wash your jars and bands in warm soapy water. Rinse thoroughly. Then, I sterilize them for a few seconds in clean, boiling water and let them drain on a clean towel on the counter. Pour boiling water over the flat lids and let them soak in hot water until ready to use.
Prepare the strawberries: Wash berries and remove the hulls. Crush the berries 1 cup at a time with a potato masher for the most uniform results. Do not use a blender, food processor, or hand blender. Crushing by hand yields the best results. Measure 5 cups of crushed berries and pour them into a large, sturdy pot.
Measure the sugar in a separate bowl. Seven cups is a lot of sugar, but you must measure exactly if you want the jam to set. If you prefer to use less sugar or a sugar substitute, you can use Sure-Jell for Less or No Sugar Recipes.
Stir the box of pectin into the crushed berries in the pot. Add butter or margarine to reduce foaming, if you want. I tried it once with it and once without it, both batches foamed about the same. So, feel free to leave it out if you want to. Turn the stove to high and bring the berry and pectin mixture to a full rolling boil (a boil that doesn’t stop bubbling when stirred) while stirring constantly. Stir in the peppers, apple cider vinegar, and the sugar. Return to a full rolling boil. Boil exactly 1 minute, while stirring constantly. Remove from heat.

Skim off any foam. Ladle jam into prepared jars, filling to within ⅛-inch of the top. Wipe jar rims and threads with a clean cloth or paper towel. Carefully place the flat lid on the glass rim. Then screw on the band. Place jars on elevated canner rack. Lower rack into canner. Water must cover jars by 1 to 2 inches; add more boiling water if needed. Cover and bring to a gentle boil. Process the jars for 10 minutes. Carefully remove the jars from the canner and sit them on the counter. After jars cool, check seals by pressing the middle of the lid with your finger. If the lid springs back, the lid is not sealed and refrigeration is necessary.
Let jars stand at room temperature for 24 hours. Store unopened jars in a cool, dry, dark place for up to 1 year. Refrigerate open jars of jam for up to 3 weeks. Yield: about 8 cups.
Strawberry Shortcake Pie

Earlier this week I went with a friend to pick fresh strawberries at a local farm. We each picked two gallons of berries! Putt planned to dry most of her strawberries (yum). I had other plans for mine: I removed the hulls and froze a large bag of whole berries for future smoothies, margaritas, and mojitos; baked a pie; and ate plenty of them plain, only washed. They were all delicious!
Today, I made my first batch of homemade strawberry jam. Or is it preserves? What is the difference between preserves and jam? That might be a future blog post. I originally planned to make a quick and easy freezer jam, because I’m a little intimidated by canning. But then I realized I’ve canned pepper jelly, so this is probably about the same.
I made eleven jars of jam: eight regular, one jar of jelly (the last jar had no pieces of fruit, so I think that is jelly), and two strawberry habanero. It sounds like a strange combination but I think it will be good on cream cheese and served with crackers. I love hearing the sounds of the lids popping. I can hear them as I type. I would include the recipe in today’s blog, but I just followed the directions inside the box of Sure-Jell fruit pectin (http://www.kraftbrands.com/surejell/howto_cookedjam.aspx). Everything worked out fine until I was cleaning up the kitchen: somehow, a tiny Mason jar fell down into the garbage disposal. I didn’t realize this until it was too late. Yep, little bits of glass all in the disposal. I think Matt and I will try to fix it this weekend. This will be the second one we have repaired (never stick flower stems down a disposal, it will likely clog it!). We never had a garbage disposal growing up, so that’s my excuse for my disposal accidents.
We support local farms when we can. We are fortunate to have several wonderful farms in North Alabama and Southern Tennessee. If you live outside the area, I hope you will support your local farms and farmers markets. Here’s some information about three of our favorite farms that provide local, fresh, and delicious strawberries (among other things)!
Brown Farms: Their farm is in New Market. Directions from Huntsville: take North Parkway/231 North, turn right on Joe Quick Road, turn left on Walnut Grove Road and follow the signs to the farm (it will be on your left). If you can’t make it to the farm to pick your own or buy fresh berries, you can buy their strawberries at local Star Market Supermarkets (the one in 5 Points usually carries them this time of year). Address & Phone: 384 Walnut Grove Rd New Market, AL 35761, 256-828-0710
For more information about Brown Farms: http://www.pickyourown.org/ALhuntsv.htm
Dennison’s Family Farm: This farm is a little further away in Elora, TN. They sell already picked strawberries at the farm or you can visit one of their cute little strawberry “houses” in Madison (across from City Hall in front of Hartlex Antiques on Hughes Road), Fayetteville, and Winchester (please call for exact locations). They also have a community supported agriculture (CSA) program if you are interested in trying one. Address & Phone: 98 Milner Switch Road, Elora, TN 37328, 931-937-8162
For more information about Dennison’s Family Farm: http://dennisonsfarm.com/ or info@dennisonsfarm.com
J. Sparks Farm: I’ve only visited this farm once, but I got a behind-the-scenes tour with the owner’s sister. It is a nice farm, and it is a little easier on the knees picking the strawberries standing up since it’s a vertical hydroponic farm. The strawberries (and lettuce) were wonderful. I’m not sure if they are growing strawberries this year, but I hope to see them back at the Greene Street Market at Nativity when they open for the season next week, on May 3rd! Address & Phone: 312 Esslinger Drive, Gurley, AL, 256-776-9881
For more information about J. Sparks Farm: http://www.jsparksfarms.com/
My public service announcement for local farms is over. And now back to the blog…

Today’s recipe is not healthy, vegan, nor is it gluten-free*. It is a once in a while splurge-worthy dessert – Strawberry Shortcake Pie. Actually, for us, it is a once every 5 year splurge. It’s a fairly simple recipe and it’s not the most outrageous dessert I make, but for some reason, we just don’t have it very often. I’ve known my husband, Matt, since 2007. I baked this pie for him the first time in May 2007 and haven’t made one since. I figure we are good until April or May of 2017! Wow, that sounds like a long way away!
I guess this recipe originally came from a magazine because my mom pasted an old clipping into her photo album cookbook. At the bottom of the recipe, it says, “continued on page 120.” Page 120 is not included in her cookbook. I’ve always wondered what was on that page! I’ve stayed fairly true to the original recipe, only made a few changes: 1) My pie plate is 9.5” instead of 9” so I increased the crust ingredients just a bit; 2) I omitted the red food coloring, I think the glaze is perfectly lovely without the added coloring; 3) Changed the name, instead of Strawberry Glazed Whipped Cream Pie it is now the Strawberry Shortcake Pie (it reminds me of the homemade shortcakes I made as a child); and 4) I sliced some of the larger strawberries, whole berries make slicing the pie challenging.
Strawberry Shortcake Pie
Shortcake Crust:
1½ cups biscuit mix (I use Bisquick)
6 tablespoons butter, softened
scant ⅓ cup boiling water
Preheat oven to 450º F. Place biscuit mix and softened butter in the bottom of a 9.5” or 10” pie pan. Pour in the boiling water. Stir mixture with a fork until it forms a soft ball and leaves the side of the pan. Don’t overwork the dough or you will end up with a tough crust. Use your fingers to pat the dough evenly over the bottom and sides of the pan. If you are good at such things, you can press the dough over the rim of the pie plate and then form the dough into a neat, decorative design on the edge. I’m not so good at that, so I just use my finger (or a fork) to make an indentation on the top edge of the crust. Use a fork to dock the crust – poke holes along the sides and bottom of the crust to allow steam to escape and keep it from puffing up. Bake 10-12 minutes until it is golden brown. If you have pie crust shields, you might want to use them to keep the edges from over-browning, but it’s not necessary. Just check the crust after baking about 9 minutes to make sure it turns golden and does not burn. Remove crust from the oven and let it cool.
Strawberry Filling:
6 cups fresh strawberries
½ cup water
2½ tablespoons cornstarch
1 cup sugar
1 tablespoon butter
Fresh whipped cream, optional garnish
Wash and drain the strawberries. Save a few pretty ones for a garnish. Remove the hulls from the rest. Crush 2 cups of the strawberries and set aside. Cut the remaining 4 cups of strawberries into halves, quarters, or slices (whatever you prefer; I just don’t like slicing into a pie with large, whole berries). In a medium saucepan, stir together the water and cornstarch. Mix well. Add the sugar and stir in the 2 cups of crushed strawberries. Bring mixture to a boil and cook until clear, about 3-5 minutes. Remove from heat. Stir in the butter. Strain the mixture using a strainer, chinois, or a clean piece of cheesecloth. Arrange the 4 cups of strawberries in the cooled pie shell. Pour the warm glaze over the strawberries. Make sure all the strawberries are covered with the glaze. Refrigerate several hours until set. Garnish with whole strawberries and fresh whipped cream. Serve. This is not a pie that ages well. It is best to make it the day you plan to eat it. It gets a little soggy and isn’t as pretty the following day. It still tastes delicious. Yes, I’ve had leftover strawberry shortcake pie for breakfast the next day! Makes 8 servings.
*Healthier Version: I think this could easily be made gluten-free by using the gluten-free baking mix from King Arthur Flour of Pamela’s Products. I just haven’t tried it yet. Also, I noticed at Publix there is a “new” Gluten-Free Bisquick. I have not tried it either. I stuck to the original Bisquick because I wanted the taste from the childhood. You could also make your own crust; a crumb or nut crust would be delicious. Or even use a spelt crust (I saw them recently at Garden Cove and Earth Fare). To make it vegan, I think margarine or coconut oil could be used to make the crust (just gotta check the biscuit mix to make sure it is vegan). The rest of the recipe only has 1 tablespoon of butter to make the glaze “glossy!” I think coconut oil or margarine would make it plenty glossy.
Refrigerator Pickles
 We make and eat lots of refrigerator pickles (sometimes known as cucumber/onion salad) at our house. They are quick, easy, versatile, and it’s a great way to use extra cucumbers. I learned how to make them from my Mom. I think she learned how to make them from Nanny, her grandmother. We had a large garden growing up and we had loads of cucumbers. There are just so many bread and butter pickles one can eat, and then it’s time to make refrigerator pickles or cucumber/onion salad. Whatever you call it, it is tasty!
Refrigerator Pickles
3 cups sliced cucumbers (about 4-6 small cucumbers)
1 cup sliced onions (I use 1 small red onion and 1 small white onion)
1 teaspoon salt
½ teaspoon black pepper
pinch of cayenne pepper or red pepper flakes (optional)
1½ cups white vinegar
I like the cucumbers and onions sliced very thin so I use either a mandoline slicer or a food processor. But hand-slicing works great too (and there is less equipment to clean!). I usually leave the peel on the cucumbers, but you can peel them if you prefer.
Mix the cucumbers and onions in a larger container with a tight-fitting lid (I use a large Pyrex container or a large Mason jar). Sprinkle with the salt and pepper. Pour in the vinegar. Mix well. You can eat them immediately but I like to refrigerate them for several hours (or even several days). I just shake (thus, the tight-fitting lid) or stir them every day.

Variations:
– Add cayenne pepper or red pepper flakes.
– Add sugar, stevia, honey, or agave to cut some of the tartness.
– Add fresh garlic for an added flavor kick.
– Add thinly sliced green or red bell peppers.
– Add jalapeño pepper slices.
– Add fresh herbs (parsley, dill, chives, etc.).
– Mix it up with different onions: white, Vidalia, yellow, purple (or even shallots).
– Try different vinegars: apple cider, white vinegar, or even a splash of balsamic or red wine vinegar.
– Drain off most of the vinegar and stir in some sour cream or plain yogurt and dill for a creamy side salad.
Welcome to The Flaming Pot Holder
Evolution of the Flaming Pot Holder:
I’m not a chef. I simply love to cook. The Flaming Pot Holder is my attempt to record and share recipes with others. I adore cookbooks, even collect them, but I rarely use them. I don’t like being confined by a recipe, although I like the inspiration cookbooks provide. Friends sometime ask for recipes; however, I usually don’t have anything to give them. With this blog, I will attempt to write my recipes, take a few photos, and share both good and bad results.
This first post has been the most difficult. My husband, Matt, set up my blog site weeks ago. But I’ve been overcome with writer’s block. So I haven’t posted anything for fear that it might not be good enough. Then I realized this is an evolving project and “perfection is not attainable” (thank you Vince Lombardi and Tin Cup – probably the only sports references you will ever see on this blog). Best case, I finally record my recipes, folks enjoy the recipes, and I meet some fellow cooks along the way. Worst case, well, there really is no worst case.
This blog is called the Flaming Pot Holder because of my penchant for setting things on fire. Even “flame retardant” pot holders! Part of this is because I cook with wild abandon (messy) and part of it is that I am accident-prone (klutzy). Not a good combination.
Eventually I would like to branch out and include other things in the blog, like restaurant reviews, product recommendations, and healthy tips. But for now, it will be enough to record my recipes so I can make them again or share them with others.
My Parents – Where it All Started:
My parents gave me the greatest gift when they plopped me on a chair in the kitchen when I was four. The first thing I remember “cooking” was a salad. I got to tear the lettuce. Hey, I was four, it was a big deal! I’m sure it was iceberg because I remember the sound the lettuce made when I tore it into pieces (plus, that’s typically what you ate back then in Alabama). It took me a few years to learn knife and oven skills. But by the time I was six, there was no stopping me. I caught the cooking bug!
Much of my cooking knowledge comes from my dad. He was a wonderful cook and rarely used a recipe. His gift was his ability to taste something, analyze it, and then replicate it. We had loads of fun doing this. It sounds kind of dorky, but looking back, this was a great bonding experience for us.
My mom was also a great cook, although she didn’t understand the allure of the “food detective” stuff. She was more of a recipe-follower. The exception was when she cooked comfort food. When she made cornbread, Parker House rolls, purple hull peas, fried green tomatoes, stuffed grape leaves(!), creamed corns, and country fried steak she just mixed things together, and it typically worked. Long before those celebrity Southern chefs popularized it, Mom’s philosophy was, “If you add enough butter, most anything tastes better.”
I asked Mom for recipes, but she didn’t have many recorded. When I was younger, Mom told me to watch her cook and I’d figure out her “recipes.” I watched for years, but never learned to make her cornbread. Mom died rather suddenly in December 2009 so I was never able to document her exact cornbread recipe. Since she died, I have tried several times to replicate it, and this week came darned close. It seems fitting that this is my first blog post, on my 45th birthday, in honor of my mom.

My First Recipe – Mom’s Southern Cornbread:
1/4 cup butter (Mom would’ve used a whole stick, but that’s just not healthy!)
1 large egg
1 to 1-1/2 cups buttermilk
2 cups Martha White® Self-Rising White Corn Meal Mix (with Hot Rize®)*
1. Preheat the oven to 450º F. Melt butter in a 7-9” ovenproof pan (preferably a well-seasoned and well-loved cast iron skillet). It takes about 5 to 8 minutes for the butter to melt and for the pan to heat (that’s how you get the nice crust).
2. Beat the egg in a medium bowl. Stir in about 1 cup of the buttermilk. Stir in the corn meal mix. Gently swirl the butter around to grease the sides of the pan. Then carefully pour the melted butter into the mixture. Stir to combine. Batter should be smooth and pourable. If it is too thick, gradually add some more buttermilk and pour into the prepared skillet or pan. Don’t overbeat or the cornbread will be tough.
3. Bake for 20 to 25 minutes or until golden brown.
*I specify a brand name because this is part of Mom’s recipe that I remember and she was adamant about it. I tried some other brands of cornmeal/cornbread mixes, and they were NOT the same.
Typical Disclaimer Stuff:
This blog is for my personal enjoyment. I am not an expert. I am just starting out with writing a blog. Typos might happen. This is bad because in another life, I am a Technical Writer. If you notice a mistake, please let me know so I can correct it.
As is evident by the name, cooking can be dangerous. Please use common sense when cooking with flames, fuel, and hot stuff (Even cold stuff, for that matter…who knows, you might drop a frozen turkey on your foot. Not that I would ever do anything that clumsy.). The writer is not responsible for damages of any kind, including loss of life, limb, or happiness if something doesn’t turn out like expected. Blah. Blah. Blah. Think this is enough “legalese” to cover myself (I hope).

